Monday, December 15, 2025

Ladi Pav / Eggless dinner rolls

 Ladi means row and Pav means bread derived from Portuguese Pao - so this refers to the bread rolls baked in a row in a single pan and pulled apart when served. 

Ladi Pav is a popular food item in Mumbai and used as a base in many Mumbai street foods like Vada pav, Dabeli, Misal Pav, Pav bhaji, Bun maska…..Home made ones are so easy to make and preservative free too - can be ready in less than 2 hours. Yes we just prepped up in the morning after bfast and baked them mid morning and it was ready for our lunchtime! The freshness you can see and taste in homemade Ladi PAV wants you to eat more - once you taste success your tongue wants more ;). 

Ingredients 

Milk - 3/4 cup (warm)

Sugar - 1 Tbsp

Active dry yeast - 1 Tbsp

All purpose flour - 4 Cups

Butter - 4 tbsp

Salt - 1tsp

Method

Mix the sugar in the milk and let it sit. 

To this add the active dry yeast and mix well. Let it sit for 7mins.

Take the all purpose flour, add the butter, Salt, yeast mixture in the stand mixer bowl.

Start kneading the dough on medium speed. To this add 1/2 cup of warm water. Knead for about 7mins.

After 7mins, stop the mixer and bring the dough together and cover the bowl. Let the dough sit in a warm place for proving for an hour.

Now, place the dough on your working space and knead a bit - divide into 12 equal portions.

Grease the baking tray with butter or Oil - roll each portion of the dough in between your palms to form balls and place the on the tray in a row/line. Let this prove again for another 30mins.

Apply some milk on the top

Bake at 360F pre heated oven for 20-25mins depending on your oven. 

Once you take the bread out of the oven, brush them with some butter on the top and cover them with a damp towel. Let this sit covered for about 15mins.

Once done, uncover the towel and pull them apart to feel the soft fluffy dinner rolls.


Ladi Pav or Dinner rolls are ready to be served with the choice of your soup or any street food you like!

So once you taste home made = your tongue wants more :):). 


Chocolate chip muffin

Chocolate chip muffin is one of our all time favorite and a must during holiday season. This time around with our new stand mixer all the more interesting to experiment dishes! Here’s the first one of the lot -  

Ingredients

All purpose flour - 21/2 cups

Baking powder - 2 tsp

Baking soda - 1/2 tsp

Salt - 1/2 tsp

Unsalted butter - 1 1/2 sticks at room temp

Sugar - 1 1/2 cups

Eggs-3

Milk - 1/4cup

Sour cream - 8 ounces

Vanilla essence - 1 1/2 tsp

Choco chips - 1 cup


Method

Sieve all the dry ingredients in a bowl. Keep this aside.

Pour the butter in the stand mixer 

Add sugar. Add the paddle and cream it together for 5 mins on medium to low speed. After 5mins, this becomes light and fluffy.

Next on low speed, add one egg at a time.

Add milk and continue on low speed.

Add sour cream, this is roughly about a cup.

Add Vanilla and continue on low speed. 

Add flour mixture little by little until its just incorporated and make sure not to over mix it. Switch off the stand mixer and get the bowl out.

Now add the chocolate chips and gently mix it using a spatula.

Pre heat the oven to 350F, line the muffin tray with the cases and fill in the cases with the batter.

Bake for about 25-30mins and let it cool on the cooling rack.


Now your whole home smells of muffins and soon it ll become your family favourite too!

Happy holidays :)


Monday, November 17, 2025

Vietnamese summer rolls

This season is all about Mindfulness - so it’s being aware in everyday activity like eating, drinking, walking, breathing, washing dishes etc. I was reading a book on The art of living written by Thich Nhat Hanh. So he is a Vietnamese global leader teaching about appreciating every moment and every meal, how all living things are interconnected in a simple way. His emphasis on finding joy in the present moment and the power of a mindful/compassionate mind is amazing to read. Though hard to practise immediately - gradually we can get there. He says ‘There is no way to happiness, happiness is the way’!

So we decided to indulge on a Vietnamese dish to celebrate ‘The art of living’! Here we go - 

 Vietnamese summer rolls are an ideal dish for mindful eating - as it involves fresh ingredients, art of rolling process just enough to pliable and not to tear the rice paper. This helps our mind to focus on the task and be in the present moment. We decided to have a weekend DIY meal over the gadgets meal - so we chose our own ingredients with fresh salad veggies, tofu, vermicelli and herbs. This got us freshness and happiness together as a family!

Ingredients

  • Super thin rice noodles boiled and cooled
  • Mint finely chopped
  • Coriander leaves finely chopped
  • Red pepper thin strip
  • Carrot thin strips
  • Cucumber thin strip
  • Shallow fry firm tofu cubes/strips
  • Rice paper
  • Bean sprouts (i prefer steamed)

Method

  • To prepare the rolls, firstly pour hot water in a shallow dish. Place the rice paper in the water for 10 sec and carefully remove it and place it on a chopping board.
  • Next at the bottom of the paper, layer the noodles, veggies, tofu, sprouts and herbs according to your choices. You can also add a dash of spicy ketchup here.
  • Gently fold over once and tuck in the edges. Continue rolling until the seam is sealed.
  • Place the seam side down on a serving place and cover with a damp cloth to keep it fresh. Repeat the same steps until all the fillings are done.
  • Serve it as a healthy snack or a light meal with peanut sauce or any other spicy ketchup/sweet chilli sauce.


Monday, November 10, 2025

Pumpkin Brocoli Soup

Food prepared with love tastes like happiness! Likewise eating mindfully lets us feel it - eating slowly, taste fully without any gadget distractions (biggest challenge in this age) brings us that happiness through food. When we honour the food on our plate, we honour the earth, the hands that made it and the life it gives us! So lets enjoy the calmness and reflect on this tasty yet healthy soup for a supper night!


Ingredients

Olive Oil - 1 Tbsp

Garlic - 4 pods

Onions sliced - 1

Walnuts -3

Black pepper powder - 1 Tbsp

Pumpkin - 200 gms

Broccoli - 200 gms

Salt to taste

Water - 500ml

Milk - 300ml


Method

Chop the Pumpkin, Broccoli and Onions.

In a pan add Oil and saute garlic, Onions until slightly brown.

Then add Walnuts, and Pepper. To this add the Pumpkin and Broccoli - saute for 2/3 minutes.

Add Salt and Water - mix well. Cover and cook for 15 minutes on medium heat.

Then let this cool. Once it cooled, blend the mixture into a smooth paste.

Add this back in a pan with the milk and bring it to boil.

Switch off the heat and ready to serve the hot delicious soup with the choice of your bread!

We decide to slow down and savour every bite……deliciousssoooooo:):)!


Monday, January 30, 2023

Baked Sweet Potato crisps

Lately we have been munching on these gourmet vegetable crisps (beetroot, sweet potato, parsnips etc)  - no wonder they taste yum and are healthy too but soon we realised our grocery bills were ridiculous just to fancy these crisps while I could make it easily at home which tasted the same or even better i could say :). Well...not compromising but dont really wish to waste money on something thats so easy recipe and also i could control on the fat, crispness, spice levels and variety of seasoning too!!

Ingredients

Sweet Potatoes - 2

Oil for brushing

Salt

Chilli powder for seasoning (optional)

Method

Preheat the Oven to 150deg centigrade. Grease the baking trays and set aside.

Wash and peel the sweet potatoes. Use a potato chips slicer to slice the sweet potatoes into thin strips.

Place these on the baking sheet in a single layer and brush a bit of Oil. Make sure its not crowded or placed on top of one another.

Sprinkle some salt on these slices. Bake for about 20-25 mins or until crisp.

Once done, remove the trays and let it cool on the baking trays for about 5mins.

Then transfer the crisps into a bowl or a storing container and toss it with some chilli powder.

Incase the slices are not crispy enough pop them back in the oven for few more minutes until they are crispy and follow the same steps as above.

Store them in airtight container and we enjoyed them as after school snack - just place them on the dining table and they are so addictive.........vanish in no time :))


Thursday, January 26, 2023

Stuffed Karela

 Karela or bitter gourd is the most bitter vegetable I have known or eaten. Though its disliked by many of us, the veggie is rich in many vitamins like iron, potassium and helps in regulate the blood sugar. Hence beneficial for diabetics in the form of juice or a curry. One can reduce the bitterness by coating the veggie with some salt and turmeric (again this is only optional). I rather would add more onions and garlic flavoured than reducing the bitterness so that we benefit from the vegetable. Here's what i did with mini hagalkayi or karelas.

Ingredients

Mini Bitter gourds - 20 pieces

Peanuts - 4 tbsp

Coriander seeds - 4 tbsp

Cumin seeds - 2 tbsp

Oil - 4 tbsp

Onions finely chopped - 2

Ginger garlic paste - 2 tbsp

Turmeric powder - 1 tsp

Kashmiri red chilli powder - 2 tbsp

Salt to taste

Coriander leaves - 4 tbsp

Lemon juice - 1

Method

First and foremost trim the ends of the bittergourd. Slit the same and remove the seeds.

Then take this in a large bowl, add a tablespoon of salt and half teaspoon turmeric to this. Mix well so that the bitter gourds are coated well. Rub inside the slit too. Rest for 20mins.


Now for the stuffing

Roast the peanuts on a low flame until crunchy.

Then add the Coriander seeds, Cumin seeds - roast on low flame until it turns out aromatic.

Let this cool and grind into a fine powder.

Heat Oil in a pan, add Onions, ginger garlic paste and saute on medium flame until it softens.

Then add the masala powder to the this and mix well.

Add chilli powder, turmeric, salt and mix well on low flame. Take care not to burn but turns aromatic. Let this cool.

Lastly add the coriander leaves and lemon juice and mix well.

Rinse the karela to reduce the bitterness.

Then steam the karela for 15mins until soft.

Then now stuff the prepared masala into the slit and keep it ready.

Heat oil in a kadai on medium flame, place the stuffed karela in the hot oil.

Then flip the karela and cover and cook for further 5mins on low flame.

Cook uniformly until well done.

Its ready to serve !


Friday, January 13, 2023

Japanese cake

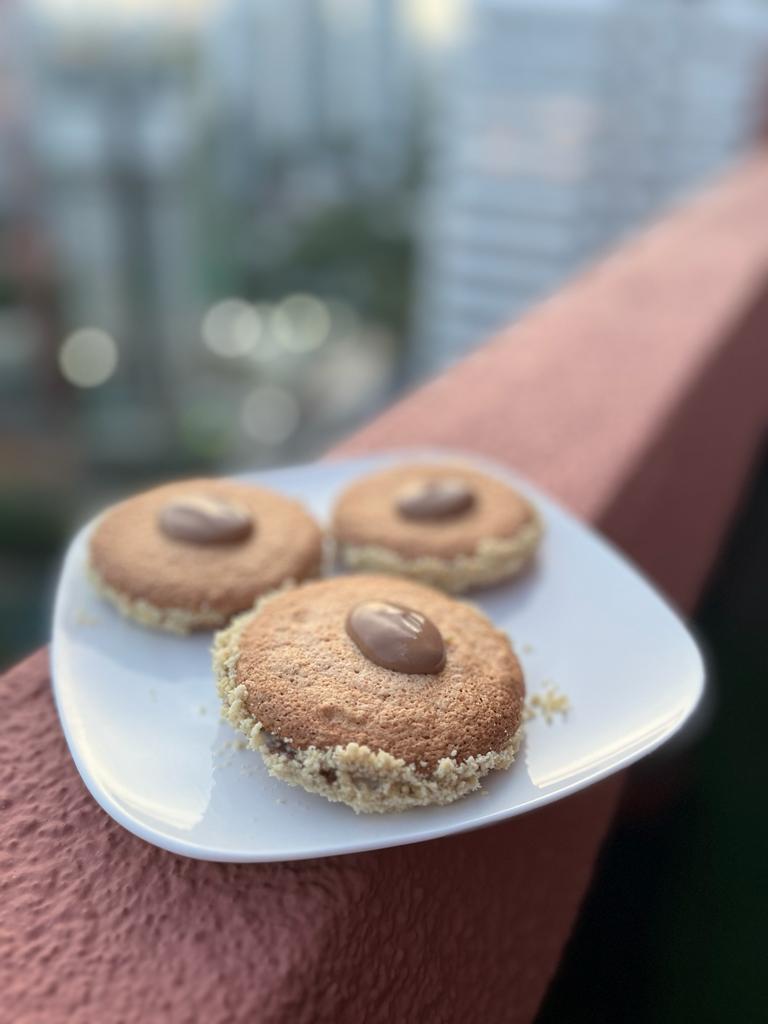
Japoneese cake - a dessert popularly called in Variar bakery is actually a whipping cream or butter cream sandwiched between two nutty meringues. Wonder where the name came from? Actually read somewhere that its a french pastry, traditionally served chilled and some times with fruits too! Whatever it is, the Japoneese cake from Namma Bengalooru's Variar bakery is one of our favourites and tried making our own version -  turned out to be delicious at our home bakery too :)

Ingredients

Cashewnut - 1 Cup

Whipping cream - 1/4 Cup

Sugar - 4 tbsp

Brown sugar - 2 tbsp

Corn flour - 1 1/2 tbsp

Vanilla essence - 1 tsp

Salt - 1/4 tsp

Egg white - 2 nos

Dark chocolate melted - 4 tbsp

Method

  • Firstly powder the cashewnuts coarsely in a mixer.
  • Keep 2.5 tbsp from the above powder aside. Roast this slightly till it turns aromatic. Keep it aside.
  • Add the brown sugar, corn flour to the coarsely ground cashew in the mixer and further pulse it. Again this has to be mixed well but not fine powder.
  • Take egg whites in a bowl, add salt and whisk it using an electric mixer. 
  • To this add the sugar slowly and continue whisking. The consistency is very important here.
  • Whisk until the meringue turns out glossy and soft peak.
  • Transfer this into a mixing bowl, to this add Vanilla essence and mix well using a spatula.
  • To this add the cashew powder in batches and mix it well in cut and fold method.
  • Do not over mix the meringue here. Do it gently to make sure no lumps are formed.
  • Transfer this into a piping bag. Prepare the baking tray with butter paper on it.
  • Now, swirl the above mixture to form cookie shape. Space it well so that when baked has enough space to expand.
  • Now, preheat the oven at 160deg centigrade for 10min. Bake these cookies for about 20-25mins.
  • Once done, separate the cookies from the baking sheet onto a tray/plate and let it cool.
  • Next, whisk the chilled whipping cream in a bowl using an electric mixer until sharp peaks appear.
  • Fill this into a piping bag.

Sandwiching the cream

  • Spread the cream which is in the piping bag onto the cookie. Start from the centre of the cookie and go around swirling until the edge of the cookie. You can do as many layers as you wish. Then place another cookie on this cream and press it slightly. 
  • Roll this prepared cookie in the roasted cashew-nuts so that the edges are coated well.
  • Add a blob of chocolate on the top!


Enjoy the mouthwatering JapOnese cake!!


Monday, January 9, 2023

Crispy Mushrooms

 There is something undeniably satisfying with the deep fried foods. But this baked version bowled us all out! These baby mushrooms tasted garlicky +  guilt-free with full of flavours. Kids said they could eat them everyday :)). We felt they could be served as a low fat appetiser too!

How to clean mushrooms

Mushrooms shouldnt really be washed. They absorb water like sponge and become soggy which we do not want in our recipe. Best way to clean them is using a damp paper towel and wipe each one of them to remove any dirt.

Ingredients

Button mushrooms cleaned - 1 tray

Bread crumbs - 1 1/4 cup

Parmesan cheese - 1/4 cup (i used mozerella here as i was running out of parmesan but turned out equally good)

Garlic powder - 1 tsp

Pepper powder - 1 tp

Coriander leaves - 1/4 cup

Egg whites - 2

Salt as per taste

Method

Preheat Oven to 200 deg centigrade and prepare the baking tray.

In a bowl, combine bread crumbs, powders, coriander leaves.

In a separate bowl, whisk the egg white.

Now dip each mushroom in the egg white and roll it in the bread crumbs mixture until coated well.

Lay them on the prepared sheet and bake them for about 10-15mins or until golden brown and crispy.

Serve the crispy mushrooms with the dipping sauce of your choice!


Sunday, September 4, 2022

Peanut Ladoo

 Lagori is a traditional game in India, played between two teams in an open area with a ball and a pile of stones. I vaguely remember reading that Lagori is a Persian word which means seven stones. Maybe that's how the game got its name. 

The pile of flat stones is targeted with a ball and each team gets 3 chances to knock down the pile. Once the person knocks it, the rest of them run to stack it up, while the other team grabs the ball and aims to hit the opposing team. The person who gets hit by the ball is eliminated from the game. This is how they mark points and continue till one of the teams wins. It's so much fun running and screaming - it's all worth indulging ourselves in goodies :)!! Well....though there was no running, there was lots of screaming involved today as we gulped the peanut ladoos. Yes, when I finished making and was taking pictures piling the ladoos, Lagori came to my mind - the best childhood days we had without any wifi or screen time. I wonder how we all managed life without google guru :)????

Ingredients

Peanuts - 1 Cup

Sesame seeds - 3 tbsp

Jaggery - 3/4 Cup

Dry coconut grated - 1/2 Cup

Cardamom - 1

Method

  • Roast the peanuts on low flame for about 8-10 mins. Transfer this to a plate and let it cool.
  • Roast the sesame seeds on low flame until it sizzles. Transfer this on to a plate as well.
  • Peel the peanut and powder it in a mixie along with cardamom.
  • Add the jaggery and ground the above mixture to a fine powder. Transfer this to a large bowl.
  • Add the sesame seeds, coconut to the above and mix well.
  • Form into the required sized balls and enjoy.

You can store this healthy ladoo rich in calcium and iron for a week in an air tight container.


Friday, May 13, 2022

Happiness is.......the Joy of making Rangoli :)!

 Happiness is...... the joy of making Rangoli designs! My new found art form for this season - never thought I could get to it. Since my childhood I always admired my mom for her precision in her Rangoli designs. She does them effortlessly, be it a dotted one or a free hand. It's amazing to see her do them patiently everyday and the smile on her face when she finishes a design is worth a million dollars. 

Now in my free time I tried my hand at practising one of my passions - Rangoli, the traditional art form of India. 

Its so magical when you start drawing yet based on mathematical calculations.Once you finish the sense of satisfaction is amazing! Yet you rub it out the next day to create another new design - such a beautiful life skill that our elders have given us. Rubbing it out teaches us to let go of things in life and start a fresh day all together. Hats off to our tradition 🙏. We will try to adapt wherever possible in this bussssssyyyyyyyyy lifestyle.


Spread the Positivity around you :)!


Thursday, April 28, 2022

Saravana Bhavan style Tomato Onion Chutney

 We were recalling our London days and the restaurants we tried during our stay. One such memorable was the countless stops to SB as it was very close to our place - either it was for coffee mornings,Sunday brunches, mid-week dinners or just a lazy day meal... and also not to forget our after long/short trips takeaways. His stuffed capsicum and kottu parathas were the best! Next was the tomato chutney along with any south Indian breakfast dish is a must. It was so yummy that we used to gobble just on itself!

Tomato chutney is a spicy accompaniment usually eaten with Dosa, Idli, akki rotti, Vada, Uttapam. It is a healthier option as it has no coconut and hence less cholesterol. It can be prepared well in advance and store in the refrigerator up to a week.

This became our family favourite as a spread, salsa too :))! It can be eaten with any crackers or khakras as an evening snack/after school snack.

Ingredients

Onions chopped - 1 Cup

Tomatoes chopped - 2 Cups

Chana dal - 3 Tbsp

Dried Red Chillies - 6

Garlic cloves - 4

Kashmiri lal mirch - 1/2 tsp

Oil - 2 Tbsp

Salt to taste

For the tempering

Oil - 2 tsp

Mustard seeds- 1 tsp

Chanadal - 1/2 tsp

Urad dal - 1 tsp

Hing - a big pinch

Jeera - 1 tsp

Haldi - 1/4 tsp

Few Curry leaves 

Method

  • Heat Oil in a pan, add the Chana dal and red chillies. Fry for few minutes.
  • To this add the Garlic and continuing frying for few minutes.
  • Add the Onions, cook until translucent.
  • Next add the tomatoes, chilli powder and salt. Mix well and cook until soft.
  • Let this mixture cool. Later on grind the same in a mixie into a fine paste.
  • For the tempering, heat Oil in a small pan, add mustard seeds and allow it to splutter.
  • To this add all the dals, curry leaves and hing. 
  • Turn off the heat and then add the turmeric powder.
  • Add this tempering to the chutney and mix well.

Tomato-Onion chutney is ready to be attacked!

Have a great week ahead :)


Thursday, April 14, 2022

Caramalised Makhana

 Caramalised Makhana or Sweet Makhana is a healthy snack - especially for people who are diet conscious.

Makhana is puffed lotus seed, largely grown in parts of Bihar, India. Makhana is a good source of Calcium. It is also rich in protein and keeps us full for a long time, in turn balancing our blood sugar. Loaded with good fat too! So, why wait to include this all-rounder snack in our daily diet - one can make kheer, savoury snacks, raita, include in subjis, etc according to their taste buds.

You will need

Makhana - 2 Cups

Peanuts - handful

Jaggery - 2 Tbsp

Ghee - 1 tsp

Red Chilli Powder - 1 tsp

Sesame seeds - 1 tsp

Method

Dry roast makhana and peanuts separately in a pan on low-med flame. Keep it aside.

Take Ghee and Jaggery in the same pan, melt on low flame.

To this add salt, chilli powder and sesame seeds - mix well.

Now add the roasted peanuts and makhana to this mixture and mix well on low flame till its coated well.

Tada its ready to attack!!

Enjoy the crunchy snack all day :)!


Wednesday, May 27, 2020

Rice Chakkuli

Chakkuli, Chakli, Chakralu are all the different names for the same snack called murukku. There are varieties of chakkuli meaning many variations in the recipe - some use urad dal, rice, sago, fried gram, wheat flour, besan, etc. All of them have their unique flavor and texture!

My childhood memories go back to the Krishna Janmashtami where my mom used to make these delicious chakkulis. As a kid, the significance of this festival was only about many tindis  I would get to munch on. Excitement would build up when one of our neighbors - tamil pati would hand over her thali for us - view of those delectable dishes makes me drool even now :) - ghee appam, sweet seedai, salt seedai, tengol, nippattu, sweet poha and the list goes on. Believe me, the taste that these dishes have on that particular day is so unique maybe because we get them as prasadam from the lord - a gracious gift!
So here we decided to try one of the series of Gokulashtami tindis and it vanished in no time in our tindi poti family :))!

Ingredients
Rice flour fine - 2 1/2 Cup
Butter softened - 2 tbsp
Pinch of hing
Sesame - 1 tsp
Jeera - 1 tsp
Ajwain - 1 tsp
Kashmiri lal mirch - 1/4 tsp
Roasted gram dal/putani - 1/2 Cup
Salt to taste
Water to knead
Oil for frying

Method

  • In a large bowl, place the rice flour, butter, hing, sesame, jeera, ajwain, salt, chilli powder.
  • Grind the roasted gram dal into a fine powder.
  • Add this powder to the above bowl with other ingredients. Mix well.
  • Add water as needed and mix it, knead well to a soft dough. 
  • Using a chakli maker, press the dough into a spiral shape onto a butter paper.
  • Seal the ends so that they don't separate while deep frying.
  • Take one chakkuli at a time and slide it into the hot oil.
  • Flip the chakkulis and fry them on medium flame until crispy on both sides.
  • Drain them on a kitchen roll to remove excess oil.
  • Crispy chakkulis are ready to be served with hot chai or coffee!


Thursday, May 21, 2020

Ragi Phulkas

Rotis, Chapatis, Phulkas are all inherent parts of the Indian diet. They are power-packed with energy - a good source of fiber too. It keeps you full for longer and thus can handle your hunger pangs so we prefer rotis over rice. Thus we keep trying variety here - Ragi roti, akki roti, thalipeet, jowar roti, etc.

Ragi roti is a nutritious way of eating Ragi or finger millet if one struggles to swallow the ragi mudde. Ragi is more healthy especially for diabetics as it's gluten-free and rich in Calcium + iron! I can't say it's easy to make - but yes once you get a hang of rolling and carefully lifting the rotis its definitely easy :).

Ingredients
Ragi flour - 1 Cup
Water - 1 Cup
Salt - 1 tsp
Oil - 1tsp

Method


  • Heat water in a thick bottomed vessel. Bring this to boil.
  • Next add salt and oil. Mix well.
  • Then reduce the heat to low, add the ragi flour and mix well so that no lumps are formed.
  • Transfer this onto a thali/plate. Let it cool a bit so that you can handle the dough.
  • knead well to form a firm and smooth dough. If required grease your hands with some oil.
  • Take a small portion of the dough and roll out using a rolling pin. You can use ragi flour for dusting.
  • Roll it gently so that it doesn't stick to the rolling pin nor the board.
  • Place this on a heated tava.
  • Flip both sides and once you see those small bubbles on the roti, start pressing the roti with a cloth or a spatula. It will puff up like a poori.
  • Serve hot with ghee or butter and choice of your subji.


Tuesday, May 19, 2020

Mexican Madness!

There are times when I feel lazy to make a proper meal and that's the time for quick Quesadillas :)! 

Quesadillas are basically a Mexican dish but somewhere read that long time ago Spanish brought their dairy products into to Mexico and hence the Mexicans turned up a cheesy dish out of it called Quesadillas. Queso in Spanish means cheese and  Queso + tortillas became Quesadillas!

Original Quesadillas are simply grilled tortillas with melted cheese sandwiched in it.
But we prefer whole-grain tortillas along with some veggies + lots of cheese to make it enticing and delicious :). And the speedy meal is ready in less than 10 minutes too!

Ingredients
Whole grain flour tortilla - 10
Butter for brushing the tortillas
Grated cheese of your choice (i use cheddar) - 2 Cups
Sweetcorn kernels - 1 Cup
Green / Red Peppers finely chopped - 1
Onions finely chopped - 1
Green chilies finely chopped - 1
Salt to taste
Black pepper powder - 1/2 tsp 
Paprika - 1 tsp
Oil - 2 tbsp

Method
  • Heat oil in a pan, add chilies, Onions and saute for a few minutes.
  • Then add all the other veggies and saute for a minute or two.
  • Add salt, paprika, and pepper powder and mix well. Transfer this into a bowl.
  • Once this cools, add the Cheese.
  • Heat the tava and brush some butter.
  • To prepare the quesadilla - spread the veggie mixture on 1 roti and top it with extra cheese (if you want to make it stretchy and cheesy) and cover this with another roti.
  • Place this on the hot buttered tava and roast on low flame.
  • Flip it over and roast until golden brown.
  • Cut it into the desired shape and serve hot with Salsa.


Sunday, May 17, 2020

Veg Manchurian

Our summer holidays used to be with reading books, visiting book stores, borrowing books from a library, or cursive writing (popularly termed as copywriting) and not to forget storytelling. Of course along with all the playtime and cooking experiments etc :).

Now we have transferred that love for books to our kids! And we buy books quite frequently. But when the lockdown came in, we started looking out for other options to get access to the reading material. We were amazed to see the hidden world out there - audiobooks, documentaries, etc. But nothing can beat the thrill of holding a book and reading it none the less still enjoyed the online version.

With this, our older one loves storytelling and the younger one is an ardent listener to her brother. He comes up with all the audio/visual effects and makes it enjoyable. They go on and on whether its a mythological or a fairytale. We felt this comes naturally to a few of them - just let go of yourself and not self-conscious, you can tell a story. I guess that's how our folktales and other traditional stories came up. Especially when you don't have access to books, storytelling becomes a sharing of quality.
Technology is for now but when sharing happens it's for life! "This is the best investment we can make for our kids".

And thus, a time for virtual cuddle ups - introduced my son for story writing on https://radiancestories.blogspot.com/ and he is enjoying penning down the tales in his own words.

Ingredients
For Manchurian balls
Carrot grated - 1
Cabbage shredded - 5 tbsp
Spring Onions chopped - 5 tbsp
Onions finely chopped - 1/2
Ginger garlic grated - 1 tsp
Chilli sauce - 1 tsp
Salt - 1/2 tsp
Plain flour/Maida - 2 tbsp
Cornflour - 2 tbsp
Oil for deep frying

For gravy
Oil - 2 tbsp
Ginger grated - 1 inch
Garlic grated - 3 cloves
Green chillies slit - 1
Spring Onion chopped - 4 tbsp
Onion finely chopped - 1/2
Capsicum sliced - 1/2
Vinegar - 2 tbsp
Soya sauce - 2 tbsp
Chilli sauce - 1 tsp
Tomato sauce - 2 tbsp
Pepper powder - 1/2 tsp
Salt to taste
Water - 1 1/4 Cup

For slurry
Corn flour - 2 tbsp
Water - 1/4 cup

Method

  • In a large bowl, place the Carrots, Cabbage, Onions, Spring Onions, Ginger, and Garlic.
  • Next, add the Salt and Chilli sauce. Mix well.
  • Further, add Maida and Corn flour and mix well. Form this into a soft dough.
  • Now shape the dough into small balls and deep fry them on medium heat until golden brown in colour.
  • Drain them on a kitchen towel and keep it aside.
  • In another large wok, heat oil and saute the ginger-garlic, chilies and spring onions.
  • Add Onions and stir fry on high flame.
  • Next to this add the capsicum and further stir fry.
  • Then add the Soya sauce, vinegar, tomato sauce, chilli sauce, pepper powder, and salt. Stir fry making sure all the sauces are combined well.
  • To this add the water and boil on medium heat.
  • Now, in another small bowl, mix together the cornflour and water to form a smooth paste.
  • Add this to the above gravy and continue to boil until the gravy thickens and is glossy.
  • Add in the fried veg manchurian balls and remaining spring onions and mix well.
  • Veg Manchurian is ready to be served with fried rice!

Friday, May 15, 2020

Crispy Bhindi

Crispy bhindi is a delicious dish made differently from the normal method. 

Bhindi is one of our favourite vegetable and holds most dear position on our cooking :)! We love anything to do with this ladyfinger - gojju, palya, majjige huli, pakoda etc With each variety boasting its flavour it would be unfair to choose one over the other. So we did complete justice to this appetizing dish flavoured with some peanuts and cashews to give a crackling effect! Here's what we did for crispy bhindi...

Ingredients
Bhindi washed, wiped and chopped - 2 Cups
Oil for deep frying
Oil - 2 Tbsp
Garlic pods - 4
Mustard seeds - 1/2 tsp
Chana dal - 1/2 tsp
Urad dal - 1/2 tsp
Turmeric powder - 1/2 tsp
Hing - 1/4 tsp
Peanuts - 1/4 cup
Cashews split - a handful
Curry leaves - a handful or more
Kashmiri red chilli powder - 1 tsp
Dry Mango Powder / amchur - 1/2 tsp

Method

  • Heat oil in a pan, deep fry all the bhindi on medium flame until crisp. Drain them on a kitchen towel and keep it aside.
  • Deep fry the curry leaves, cashews and peanuts separately until they become crisp and slight dark in colour. Drain them on the kitchen towel.
  • Heat oil in another pan, add the mustard seeds, dals, Haldi, hing and Garlic pods.
  • To this add the fried Bhindis, nuts and the curry leaves.
  • Toss it with some salt, chilli powder and amchur powder.
  • Mix well and ready to be served as a starter/ snack or even a side dish!


Monday, May 11, 2020

Pita Bread

Pita bread is a Meditteranean cuisine.

We love the falafels and hummus combo + fresh Salad with Pita pockets. They are so compact and easy to hold/ carry - makes a perfect protein-filled lunchbox meal!
It's a very straight forward recipe and comes out best when homemade :). Watching them puff on the tava or in the Oven is a culinary magic at its best :):)! Here's what we did to get those fluffy pockets....

Ingredients
Warm water - 1 Cup
Active dry yeast - 1/2 tsp
All-purpose flour - 2 Cups
Whole wheat flour - 3/4 Cup
Salt to taste
Sugar - 1 Tbsp
Olive Oil - 2 tsp

Method

  • Firstly, take the water, sugar, and yeast in a bowl. Mix well and let it sit for about 5 minutes until the yeast gets activated.
  • In another large bowl, add the flours, Salt, Olive Oil. Mix well.
  • To this add the yeast water and mix well until a shaggy dough is formed.
  • Transfer this on a clean work surface. Sprinkle some flour on the surface and knead the dough until smooth for about 6-8 minutes.
  • Next coat the mixing bowl with a thin layer of Olive Oil, set the dough in the bowl and turn it until its coated with the Oil.
  • Cover this with a clean cloth or a plastic wrap and keep it aside for 1-2 hours or until the dough has risen double the size.
  • Gently deflate the dough and transfer it on a floured surface.
  • Divide the dough into equal size balls and gently flatten each ball into a thick disk.
  • Sprinkle some more flour on the disks and cover and keep aside.
  • Using a rolling pin, roll the disks into 6-inch circles with about a 1/4 inch thickness.
  • Sprinkle the flour as needed.
  • Let this final shaped dough rest for 2-30 minutes or until slightly risen.
  • Heat the skillet on medium-high heat.  
  • Drizzle a bit of Oil on the skillet, place the rolled out Pita on the skillet and bake for about 30 seconds until you see some bubbles. Flip and cook another 1-2 minutes on the other side.
  • Flip again and cook another 1-2 minutes to toast on the other side. The pita should start to puff up by now. (You can press the surface gently to puff up the Pita).
  • Keep the cooked Pitas covered with a clean dishcloth while you do the remaining Pitas.
  • Soft homemade Pita is ready!
Pitas are best when eaten immediately after cooking. Even if you get Pitas that don't puff, you can tear them into pieces and use them for dipping in hummus


Friday, May 8, 2020

Pineapple Salad

Pineapple Salad is a perfect way to enjoy the summer fruits. It's easy to make and simply delicious!

The sweetness of the Pineapple is balanced out with some pungent garlic + fiery chillies along with Soy Sauce as the dressing. Trust me every time I make this for any get-togethers, we come back every second for this - yes, it's an eye-catcher :)! It's so colourful, the bright yellow of Pineapple and dark green toppings of Coriander leaves draw all your attention to the salad bowl :)).

It's a great dish to choose when you have less time, yet want something tasty to go with your main course! Be it for just your family, a potluck or a BBQ/ parties this dish will surely be a super hit!

Ingredients
Pineapple - 1 chopped into small chunks
Soya Sauce - 1 Tbsp
Garlic grated - 4 cloves
Sugar - 1 tsp
Green chillies finely chopped - 2
Roasted Peanuts deskinned and coarsely crushed - 1/2 Cup
Coriander leaves finely chopped for garnishing - handful (you can garnish with any greens you like - mint, Spring Onion greens)

Method

  • Place the pineapple chunks in a large bowl.
  • In another small bowl, add the Soya sauce, garlic, chillies, sugar. Mix well and keep it aside.
  • Dry roast the peanuts on a Tava.
  • Wait for it to cool, then rub the peanuts to deskin them.
  • Coarsely crush the peanuts in a grinder.
  • Now, add the dressing i.e soya mixture to the Pineapple and mix well.
  • Add the Peanuts and greens just before serving.
  • Mix well and the crunchy salad is ready to be served!


Tuesday, May 5, 2020

Shenga Holige

Shenga holige is a north Karnataka dish. Shenga means Peanuts, so its Peanut holige.

We are a family of great liking for sweet-tasting foods. We have been almost following the restrictive lifestyle strictly but failed to social distance from pet pooja :-p.
So we had this ellu bella remaining from Sankranti and got bored of munching them. I thought of a plan to keep my little one occupied and also get over with the mixture. She was happy to separate the peanuts, jaggery and sesame from the mix and made shenga holige with this!

We declare that shenga holige is a healthy dessert free from any extra Oil and full of good cholesterol + Vit and minerals :). So pamper yourself with this irresistible Shenga holige rather than a handful of plain peanuts :))!!!!! Here we go.....

Makes - 
Ingredients

Peanuts roasted - 2 Cups
Sesame roasted - 1/2 Cup
Jaggery - 2 Cups
Cardamom powder - 1/2 tsp
Plain flour - 2 Cups
Chiroti Rave / fine semolina - 1/4 Cup
Salt - pinch
Hot Oil - 1 tsp
Water for mixing

Method
For the kanaka (dough)

  • In a large bowl, add the Plain flour, Chiroti rave, Salt, Oil, and mix well.
  • To this add the Water little by little and mix well to form a dough.
  • Let it rest for 3-4 hours.
For the hoorna (filling)
  • Grind Peanuts, Sesame, and Jaggery to a powder.
  • Place this mixture in a bowl. To this add the Cardamom powder and mix well.
  • Add a bit of hot water to the above mixture and mix well to form a dough. (Add the hot water at this stage only if required else just mix the powder and form a dough).
To make the holige
  • Take a small portion of the dough, flatten it a bit.
  • Take a handful of hoorna and stuff it in the flattened dough.
  • Pull the dough from the edges and cover it over the hoorna and make sure you seal it well.
  • Dust this in some flour and roll it gently into thin circle.
  • Place this on a hot tava and cook on both sides on low flame.
  • This doesnt need any Oil on the top as the nuts and sesame Oil is sufficient for cooking it.
  • Serve hot with ghee!


Indulgence at its best :)!!!!!!


Blog Widget by LinkWithin