Monday, January 30, 2023

Baked Sweet Potato crisps

Lately we have been munching on these gourmet vegetable crisps (beetroot, sweet potato, parsnips etc)  - no wonder they taste yum and are healthy too but soon we realised our grocery bills were ridiculous just to fancy these crisps while I could make it easily at home which tasted the same or even better i could say :). Well...not compromising but dont really wish to waste money on something thats so easy recipe and also i could control on the fat, crispness, spice levels and variety of seasoning too!!

Ingredients

Sweet Potatoes - 2

Oil for brushing

Salt

Chilli powder for seasoning (optional)

Method

Preheat the Oven to 150deg centigrade. Grease the baking trays and set aside.

Wash and peel the sweet potatoes. Use a potato chips slicer to slice the sweet potatoes into thin strips.

Place these on the baking sheet in a single layer and brush a bit of Oil. Make sure its not crowded or placed on top of one another.

Sprinkle some salt on these slices. Bake for about 20-25 mins or until crisp.

Once done, remove the trays and let it cool on the baking trays for about 5mins.

Then transfer the crisps into a bowl or a storing container and toss it with some chilli powder.

Incase the slices are not crispy enough pop them back in the oven for few more minutes until they are crispy and follow the same steps as above.

Store them in airtight container and we enjoyed them as after school snack - just place them on the dining table and they are so addictive.........vanish in no time :))




Thursday, January 26, 2023

Stuffed Karela

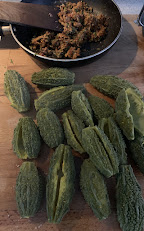
 Karela or bitter gourd is the most bitter vegetable I have known or eaten. Though its disliked by many of us, the veggie is rich in many vitamins like iron, potassium and helps in regulate the blood sugar. Hence beneficial for diabetics in the form of juice or a curry. One can reduce the bitterness by coating the veggie with some salt and turmeric (again this is only optional). I rather would add more onions and garlic flavoured than reducing the bitterness so that we benefit from the vegetable. Here's what i did with mini hagalkayi or karelas.

Ingredients

Mini Bitter gourds - 20 pieces

Peanuts - 4 tbsp

Coriander seeds - 4 tbsp

Cumin seeds - 2 tbsp

Oil - 4 tbsp

Onions finely chopped - 2

Ginger garlic paste - 2 tbsp

Turmeric powder - 1 tsp

Kashmiri red chilli powder - 2 tbsp

Salt to taste

Coriander leaves - 4 tbsp

Lemon juice - 1

Method

First and foremost trim the ends of the bittergourd. Slit the same and remove the seeds.

Then take this in a large bowl, add a tablespoon of salt and half teaspoon turmeric to this. Mix well so that the bitter gourds are coated well. Rub inside the slit too. Rest for 20mins.


Now for the stuffing

Roast the peanuts on a low flame until crunchy.

Then add the Coriander seeds, Cumin seeds - roast on low flame until it turns out aromatic.

Let this cool and grind into a fine powder.

Heat Oil in a pan, add Onions, ginger garlic paste and saute on medium flame until it softens.

Then add the masala powder to the this and mix well.

Add chilli powder, turmeric, salt and mix well on low flame. Take care not to burn but turns aromatic. Let this cool.

Lastly add the coriander leaves and lemon juice and mix well.

Rinse the karela to reduce the bitterness.

Then steam the karela for 15mins until soft.

Then now stuff the prepared masala into the slit and keep it ready.

Heat oil in a kadai on medium flame, place the stuffed karela in the hot oil.

Then flip the karela and cover and cook for further 5mins on low flame.

Cook uniformly until well done.

Its ready to serve !


Friday, January 13, 2023

Japanese cake

Japoneese cake - a dessert popularly called in Variar bakery is actually a whipping cream or butter cream sandwiched between two nutty meringues. Wonder where the name came from? Actually read somewhere that its a french pastry, traditionally served chilled and some times with fruits too! Whatever it is, the Japoneese cake from Namma Bengalooru's Variar bakery is one of our favourites and tried making our own version -  turned out to be delicious at our home bakery too :)

Ingredients

Cashewnut - 1 Cup

Whipping cream - 1/4 Cup

Sugar - 4 tbsp

Brown sugar - 2 tbsp

Corn flour - 1 1/2 tbsp

Vanilla essence - 1 tsp

Salt - 1/4 tsp

Egg white - 2 nos

Dark chocolate melted - 4 tbsp

Method

  • Firstly powder the cashewnuts coarsely in a mixer.
  • Keep 2.5 tbsp from the above powder aside. Roast this slightly till it turns aromatic. Keep it aside.
  • Add the brown sugar, corn flour to the coarsely ground cashew in the mixer and further pulse it. Again this has to be mixed well but not fine powder.
  • Take egg whites in a bowl, add salt and whisk it using an electric mixer. 
  • To this add the sugar slowly and continue whisking. The consistency is very important here.
  • Whisk until the meringue turns out glossy and soft peak.
  • Transfer this into a mixing bowl, to this add Vanilla essence and mix well using a spatula.
  • To this add the cashew powder in batches and mix it well in cut and fold method.
  • Do not over mix the meringue here. Do it gently to make sure no lumps are formed.
  • Transfer this into a piping bag. Prepare the baking tray with butter paper on it.
  • Now, swirl the above mixture to form cookie shape. Space it well so that when baked has enough space to expand.
  • Now, preheat the oven at 160deg centigrade for 10min. Bake these cookies for about 20-25mins.
  • Once done, separate the cookies from the baking sheet onto a tray/plate and let it cool.
  • Next, whisk the chilled whipping cream in a bowl using an electric mixer until sharp peaks appear.
  • Fill this into a piping bag.

Sandwiching the cream

  • Spread the cream which is in the piping bag onto the cookie. Start from the centre of the cookie and go around swirling until the edge of the cookie. You can do as many layers as you wish. Then place another cookie on this cream and press it slightly. 
  • Roll this prepared cookie in the roasted cashew-nuts so that the edges are coated well.
  • Add a blob of chocolate on the top!


Enjoy the mouthwatering JapOnese cake!!


Monday, January 9, 2023

Crispy Mushrooms

 There is something undeniably satisfying with the deep fried foods. But this baked version bowled us all out! These baby mushrooms tasted garlicky +  guilt-free with full of flavours. Kids said they could eat them everyday :)). We felt they could be served as a low fat appetiser too!

How to clean mushrooms

Mushrooms shouldnt really be washed. They absorb water like sponge and become soggy which we do not want in our recipe. Best way to clean them is using a damp paper towel and wipe each one of them to remove any dirt.

Ingredients

Button mushrooms cleaned - 1 tray

Bread crumbs - 1 1/4 cup

Parmesan cheese - 1/4 cup (i used mozerella here as i was running out of parmesan but turned out equally good)

Garlic powder - 1 tsp

Pepper powder - 1 tp

Coriander leaves - 1/4 cup

Egg whites - 2

Salt as per taste

Method

Preheat Oven to 200 deg centigrade and prepare the baking tray.

In a bowl, combine bread crumbs, powders, coriander leaves.

In a separate bowl, whisk the egg white.

Now dip each mushroom in the egg white and roll it in the bread crumbs mixture until coated well.

Lay them on the prepared sheet and bake them for about 10-15mins or until golden brown and crispy.

Serve the crispy mushrooms with the dipping sauce of your choice!


Blog Widget by LinkWithin